
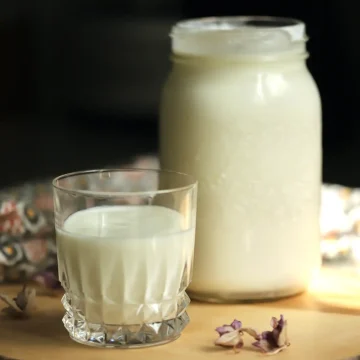
Milk kefir is a wonderful source of probiotics, easy to make and super economical. Let me show you how to make milk kefir at home.

At the time I am writing this blog post, I have been making milk kefir for 10 years. I will be sharing a simple milk kefir recipe and lots of useful tips. Once you learn to make a basic milk kefir, I will have some really cool and more advanced recipes for you to try as well. Watch the video below for how easy it is to make milk kefir.
Why Should I Make My Own Milk Kefir?
Milk kefir, being a fermented dairy, is low in lactose and easier to digest than regular milk. It is also one of the best sources of probiotics, containing a diverse array of beneficial microbes to support gut health and the immune system.
In contrast to commercially made milk kefir from a starter culture, I will show you how to ferment your milk kefir using kefir grains, which contains a much higher variety of probiotic bacteria and yeasts than the commercial versions. Besides, you can avoid additives and sweeteners when making your own, and enjoy fresh kefir daily.
Making your own milk kefir at home definitely maximizes the health benefits. It’s also extremely simple to do and saves on grocery costs.
Milk Kefir Ingredients
- Organic Whole Milk: The main reason for me to make milk kefir at home is to maximize health benefits, so it’s a non-negotiable for me to use organic milk. This is not a must for you, if you are constrained by a budget. The higher fat content whole milk is the best choice because it makes creamier and thicker kefir. I also use strictly whole milk because it’s the healthier choice for myself. You can still use skim milk, but know that it won’t be as creamy.
- Milk Kefir Grains: Milk kefir grains are not real grains. They are spongy clusters resembling cauliflower florets; they are living structures containing a mix of bacteria and yeasts. This is the culture we will use to make the milk kefir in the recipe below.

Where to Get Your Milk Kefir Grains
If you have a friend already making milk kefir, you can ask your friend, and that would be the easiest way to get your hands on some milk kefir grains. Otherwise, you will probably have the best luck searching your local kijiji or Facebook market place for someone selling their excess grains. You may also find them in health food stores, or buy them online, but I would be cautious about how the grains are kept alive (if they are fed recently and consistently), stored (in temperature that won’t damage the culture), and shipped (without leaving the grains in unfavourable conditions for extended time).
Equipments
- Glass Jars: You can reuse glass jars you already have. When choosing jar size, keep in mind the amount of kefir you will be making (which is related to the amount of kefir grains you use) and allow for extra space for air to escape into (because during fermentation your kefir will produce air bubbles). I find roughly 1 litre in capacity is a good jar size to ferment enough kefir for my consumption. You will also need some jars to store your ready-made milk kefir, and they can be any size you like.
- Strainer: You will need it to strain the milk kefir after fermentation. The strainer should be fine enough to catch all the milk kefir grains, but not too fine to prevent the kefir from flowing through. Some people recommend plastic strainers instead of metal ones, because they want to avoid getting their culture in contact with metal. Over the years, I have used both plastic strainers and stainless steel strainers. I don’t think a few minutes of contact with a stainless steel strainer harms my culture, while on the other hand, there is the concern of the negative health impact of plastics as well. I feel either is fine, and it’s up to you which one you are more comfortable with. Personally, I have used a stainless steel strainer for the last many years.
- Utensil: You will need a utensil to stir and press the kefir through the strainer. I use a spoon. You could also use a silicone or wooden spatula.
- Canning Funnel: This is optional. I like to place a canning funnel over my storage jar, and then setup my strainer over the canning funnel. This way, I can strain my milk kefir directly into the storage jar.

Fermentation
Fermentation is the key step in making milk kefir. The amount of time it takes depends on a few factors, such as how much kefir grains you are using, how much milk you are fermenting, and how warm the temperature is.
Temperature
The ideal temperature for fermenting milk kefir is room temperature, which is about 20-25℃ in most people’s homes. However, it’s completely fine if you go above or below by a few degrees. Keep in mind that the higher the temperature, the faster your milk will ferment, and the less time it will take. Vice versa, the lower the temperature, the slower your milk will ferment, and the longer time it will take.
My house is usually around 24℃ as I prefer a warmer temperature than most people. I would not leave my milk or kefir out at above 30℃ due to the risk of spoilage. Cold temperature is used to slow down fermentation, but it will not halt fermentation completely at above freezing (see section “storage of milk kefir grains”).
Kefir Grains to Milk Ratio
I use about 1 tablespoon of milk kefir grains for 4 cups of milk. This ratio does not need to be exact, and it is only a guideline to help me ensure my milk kefir doesn’t ferment too slowly or too quickly. It usually takes me about 1 day or slightly under to ferment a batch. When you use a lot of kefir grains for a little milk, it will take a short amount of time to ferment the milk; on the other hand, if you use a small amount of kefir grains for a lot of milk, it will take longer time to ferment.
So the advantage of managing my milk kefir’s fermentation time at around 1 day is that I can avoid over-fermentation. Imagine setting out your batch during the day, and your milk kefir is ready in the middle of the night? If you are not there to collect your kefir, they will become over fermented in a few hours.
How to Tell When Your Milk Kefir Is Ready
Because the fermentation time is affected by temperature, and how much milk kefir grains and milk you are using, we won’t really know exactly how much time it will take to ferment a batch. The only way to know is by keeping an eye on when your kefir starts to separate in the bottom of the jar (see video).
Over Fermented, Now What?
You can tell your milk kefir is over fermented, when the solid (curds) is clearly separated from the liquid (whey) in large amounts. As shown in the image below, the curds are floating on top of the whey, and it took only a few hours to get to this point of over fermentation.
Over fermented milk kefir is still good to consume, but it will be a little more sour. Simply shake the jar to mix the solid and liquid back together, and then strain, you will have the exact same looking kefir but with a stronger taste.
Knowing how over-fermentation happens, we can use this technique intentionally to make other products as well (see section “amazing milk kefir products and recipes”).

Storage of Milk Kefir
Once you strain your milk kefir, keep them in a sealed glass jar, and transfer the jar into the fridge immediately. The amount you can’t consume right away can be stored in the fridge for about 1 to 2 weeks. Sometimes you can keep the kefir beyond 2 weeks, for as long as they don’t smell or taste bad. The older kefir does become more sour or develop a cheesy flavour, but it shouldn’t taste spoiled.
Storage of Milk Kefir Grains
Kefir Grains Will Multiply
During fermentation, your milk kefir grains feed on lactose, and convert them into lactic acid that gives kefir the tangy taste. As you ferment more milk, your kefir grains will continue to grow as well. The more kefir grains you have, the more milk is required to feed them and keep them alive.
When you use a growing amount of kefir grains to ferment the same amount of milk, it will also speed up your fermentation, as your culture runs out of food faster. Now it may take only 12 hours to ferment the same jar of milk that used to take a whole day to ferment. This is when you need to split your kefir grains.
By keeping your kefir grains in 2 separate jars, you will be able to ferment double amount of the milk everyday. Well, this doesn’t solve the problem entirely, if you can’t keep up consuming that much milk kefir. As some point, you will want to pause fermentation for awhile, when you have too much kefir grains or when you go on a vacation.
Fridge Method
Remember that cold temperature slows down fermentation? When you want to pause your kefir production for a while, simply submerge your grains in milk in a sealed jar, and store the jar in the fridge.
By keeping the grains in milk, you are making sure the grains have access to their food source. I have successfully kept a tablespoon of kefir grains in a litre of milk in the fridge for about a month. The kefir grains will slowly feed on the milk in the fridge and eventually turn them into kefir.
When I have spare grains that I store in the fridge, I make sure to rotate fermentation between 2 sets of kefir grains to make sure all my grains are kept active.
Freezer Method
Some people freeze the kefir grains for long term storage. I have tried this method before, but when I tried to revive the grains after a couple months, the culture was damaged and kefir did not taste good. I do not recommend this method.
What To Do with Excess Milk Kefir Grains
It’s good to have some spare kefir grains in case you accidental ruin yours. But when you have more kefir grains than you can keep alive, you can pass them on to others. This is a wonderful gift to help friends and family get into a healthy eating habit! I also sell some of mine on Facebook market place, as there are always people looking to start making their own.

Amazing Milk Kefir Products and Recipes
Now that you have your own milk kefir grains and understand the basic steps of fermentation, there is a whole world of milk kefir products you can start making at home.
Milk Kefir without Cow Milk
One of the most common issues I have come across over the years is that some people can’t consume cow milk. If you are wondering whether you can make kefir without cow milk, I have tried some alternatives in the past and I can share my experience with you.
You can definitely use goat milk as an alternative, while it is easier on the stomach than cow milk. Some people don’t like the taste of goat milk, but I really don’t mind at all as I have adapted to it. A full fat goat milk would be the best replacement for cow milk in my opinion.
I have also tried plant milks before. When choosing a plant milk, higher fat content milks work better, such as a full fat coconut milk. Because milk kefir grains need to be fed lactose, I would recommend rotating between the plant milk and an animal milk to keep the culture healthy.
Smoothies and Dressings
Milk kefir is an acquired taste for some people. Although I love the tangy plain kefir, many prefer to add some sweetness to it. If that’s you, smoothies are going to be the perfect way to go to enhance your milk kefir. You can blend it with many fruits, like berries, banana, mango, etc. When you are ready to try something a little unconventional, make this superfoods kefir maca smoothie.
You can also blend kefir into dressings and their creamy tangy flavour is quite perfect for that. My favourite is the kefir avocado green goddess dressing.
Cheese, Dips, Ice Creams and Popsicles
If we purposely over-ferment the milk kefir, we will produce 2 separate products, curds and whey. We can turn the curds into cheese and dips, while all of them still have the same probiotic benefits of kefir. Here are my favourite recipes you can make with the curds: the delicious raspberry kefir cream cheese spread, the perfect-for-summer probiotic kefir tzatziki dip, and the savoury “keto sushi” smoked salmon and kefir cheese wrap. You can then use the whey to make soda drinks.
An interesting fact about kefir is that although freezing temperature will damage some probiotic microbes, it will not kill off all of them, so you can actually make probiotic frozen desserts! Try this mango kefir ice cream, it’s heavenly, and these 3-ingredient strawberry kefir popsicles are so simple to make.
Using Kefir as a Starter Culture, or In Baking
Another really cool thing I do with kefir is using it as a starter culture. This is my cheat method and shortcut to make sourdough. The kefir sourdough pancakes is a must-try! If you like ancient grains, make these overnight banana spelt pancakes instead. And the kefir fermented honey thyme sourdough cornbread is so subtle in sweetness and gentle on the stomach.
Even if you don’t use kefir as a sourdough starter, it is a great ingredient in baking regardless. I like to use kefir in place of milk or yogurt, to give that tangy refreshing flavour and a soft texture, like in these spelt blueberry muffins and orange cranberry coconut scones.
I often re-purpose my old kefir into baked goods or as a sourdough starter.
Using Kefir in Marinades
Lastly, kefir is a wonderful meat tenderizer due to its lactic acid content. You can use kefir in marinades wherever you would use yogurt. Try this wonderful Persian chicken kabob, it’s so tender and juicy, definitely a BBQ classic. In addition to acting as the tenderizer, kefir also adds creaminess in the marinades and sauces. Another one of my favourite dishes to make with kefir is butter chicken.


Let’s connect on social media! Find me on Facebook, Instagram, YouTube and TikTok. Subscribe to my newsletter for free nourishing recipes and blog updates delivered to your inbox.
How to Make Milk Kefir
Equipment
- Canning Funnel optional
Ingredients
- 1 tablespoon milk kefir grains
- 4 cups organic whole milk
Instructions
- Place the milk kefir grains in a glass jar.
- Add milk into the jar to submerge the kefir grains, but don't fill up to the rim. Leave a couple inches of head space to allow air bubbles to escape into.
- Place the jar in a spot away from direct sunlight in the house, and let the milk ferment in room temperature for about 1 day. Shake the jar a couple times during fermentation to allow the culture to circulate and evenly spread in the milk.
- As soon as the milk kefir starts to separate in the bottom of the jar, it is ready for straining.
- Place a strainer over another jar or container of your choice, then pour the content of the first jar into the strainer in batches. Stir with a spoon to help the kefir pass through the strainer, until all the kefir is strained and only the kefir grains are left in the strainer.
- Store the strained milk kefir in a sealed glass jar in the fridge, for up to 2 weeks.
- Transfer the kefir grains in the strainer back to the first jar (the first jar doesn't need to be washed for every batch, but every few batches it should be cleaned), go to step 2 and repeat the process.
Video
Notes
- The kefir grains will grow over time. When you have more grains than you can keep up feeding, you may want to split them up into 2 jars.
- Whether you want to keep your extra grains away or pause fermentation altogether, the method is the same. Submerge your kefir grains in whole milk, in a sealed glass jar. Keep the jar in the fridge to slow down fermentation. Make sure there is enough milk as food source for the grains for the amount of time in storage, up to a month.
Nutrition


Thanks Yang
This kefir recipe is very thorough, I was actually looking for such clear and detailed instructions for years and this popped up on my social page last month like a ray of light in the dark!
I’m so excited I already got the starter material and quality organic milk today and so happy to roll up my sleeves and make kefir on my own! This will help keeping my whole family healthy and happy.
Thank you, Yang!